PINE64 has [nearly] finalized the PinePhone design

PinePhone design as of February 21, 2019

It has a headphone jack, USB-C with video output, data transfer, and 5V fast charge, and PINE64 is about 90% sure they’ve got the final design, with a few possible modifications still to come.

At Category5 TV, we’re really excited about the privacy features of the PinePhone, as discussed with Lukasz Erecinski during our recent interview. The ability to turn off the cameras, cellular data, WiFi, Bluetooth and speaker using hardware switches is definitely a sought after feature for the privacy-minded user. It comes as a bit of a surprise at first that these hardware privacy toggles will be hidden beneath the “easily removable” back cover. However, with a little more thought I begin to realize that this could be a really, really good thing. Albeit inconvenient for the impromptu Skype call with mom.

From a privacy perspective, it makes a lot of sense that the switch that re-enables your camera is hidden from accidental switching, or even from another person enabling it: Hand your child your phone to play a game and don’t worry about them accidentally triggering the camera. Similarly, it gives me great peace of mind knowing for sure that my LTE data plan isn’t being used in the background. My data minutes are a rare resource that we must conserve.

A headphone jack is very much a necessity. Personally, I listen to audio books and podcasts at night. I am not going to use Bluetooth headphones for that. I use a pillow speaker, which is ideal for nighttime listening. It also stands to be noted that the PinePhone, at a target price of just $150, is a budget phone: it is possible it will be used in markets where Bluetooth headphones (which cost significantly more than wired headphones) are not practical. At least having the headphone jack gives the budget, hard-wired option. It also means the PinePhone can be used to play music at events via loudspeaker. I know, it sounds silly, but I know businesses and restaurants who simply plug their phone into an amp to play music for the customers.

For the current mockup, PINE64 intends to put the headphone jack at the top of the phone. That’s exactly where I want it. However, some people argue it should be on the bottom. I suppose this is a personal preference thing. Back to my pillow speaker, for me, having it on the bottom would be inconvenient (my wall charger is on the far side where my pillow speaker plugs in on the opposite side). So, PINE64, being the community-centred company that they are, put it to a vote:

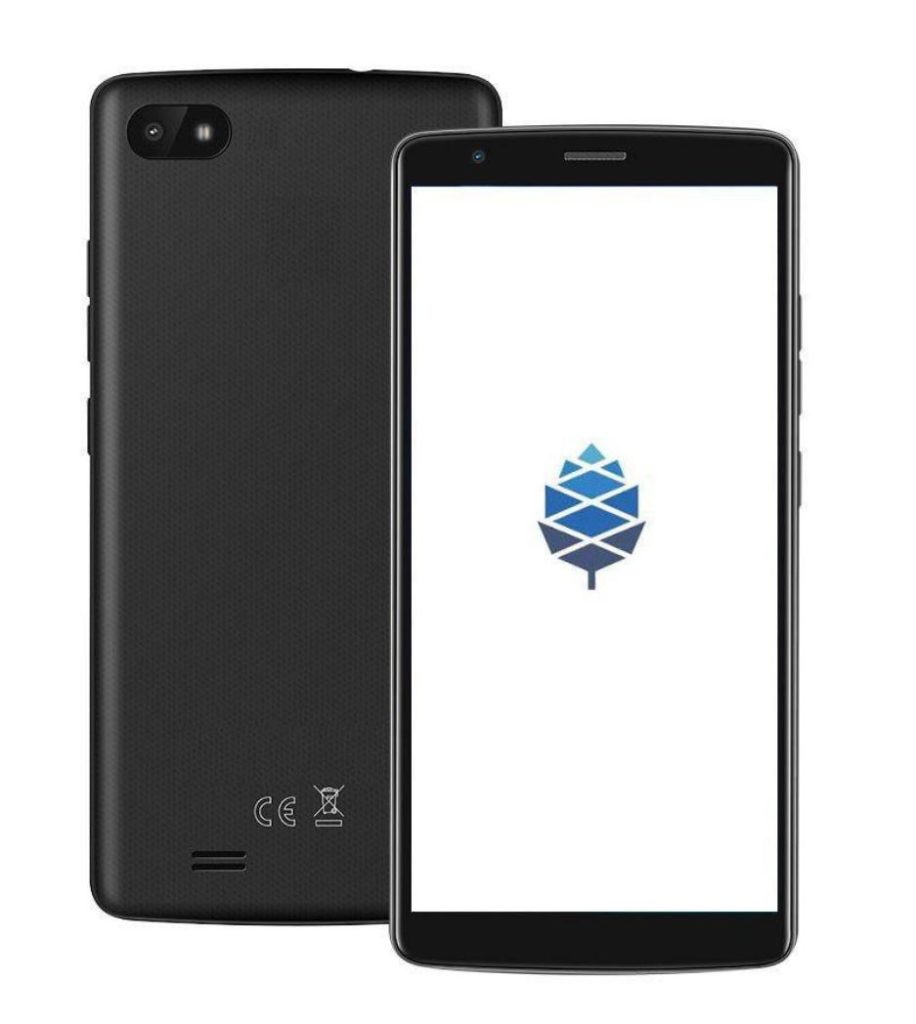
The speaker, at least for now, is on the back of the phone. I’m not particularly keen on that design features since it means the audio for the video I’m watching will be better heard by the person sitting across from me. But PINE64 says this may change in the final, final design.

The PinePhone will feature the typical volume rocker on the side of the phone, along with a lock button.

Here’s what we know so far about the upcoming PinePhone specs:

  • USB-C for data and charging, with HDMI Video Output (requires an adapter or special cable)
  • Bluetooth + WiFi
  • 4G LTE
  • Privacy (hardware) switches for BT/WiFi, LTE, cameras, speaker
  • eMMC module socket
  • mSD Slot
  • Gyro magnetic sensor
  • Light sensor
  • Volume, power, reset, home buttons
  • Audio aux
  • MiPi and TP interfaces
  • 2mpx and 5mpx front / back cameras
  • Small and compact size of (approx. 165x77mm)
  • 1440×720 IPS panel
  • SOPine module: Allwinner A64 with 2GB of LPDDR3 RAM
  • Price Target: $150

I’m really eager to start hearing of some manufacturers working on cases for the PinePhone. As of yet, I have not seen anything coming down the wire. But I’m really hoping we’ll see some attractive protective cases and screen protectors that will be suited to this new device.

I’ll continue to keep you updated as I learn more.

Here’s what PINE64 has to say on Twitter:

Plex Media Server on a Raspberry Pi 3

I wanted to document the instructions shared on Episode 459 to supplement the episode.

On the show, Jeff and I demonstrated how to turn a Raspberry Pi 3 with Raspbian Jessie into a Plex Media Server, giving you the chance to stream your entire video and music library to all your devices.

I won’t get into the full details here, since this is only a supplement to give you some copy-and-paste instructions, but I’d encourage you to watch the video.

What You Need

  1. A Raspberry Pi 3 Micro Computer. Please consider purchasing it through our store to support what we do: https://cat5.tv/pi
  2. Raspbian Jessie – A free download from raspberrypi.org
  3. Obvious stuff like a good MicroSD card, Ethernet cable (preferred as opposed to wifi), keyboard and mouse… etc.

How to Do The Do
Updated February 7, 2018
due to some evolution of the process. These steps are more current than those used in the video (a new video will be coming soon).

  1. In terminal, upgrade your distro to the latest and greatest.
    sudo apt update
    sudo apt upgrade
    sudo apt dist-upgrade
  2. Reboot the Pi.
    sudo reboot
  3. Add the ability for apt to use https repositories. If you already have this, it’ll report as “already the current version” and you can move on.
    sudo apt install apt-transport-https
  4. Add the Plex Media Server repository provided by Universität Leipzig.
    echo "deb https://dev2day.de/pms/ jessie main" | sudo tee /etc/apt/sources.list.d/pms.list
  5. Add the GPG key for the repository.
    This is the “easy” method (which didn’t work for us because my keyboard was in some weird mode with no pipe character):

    wget -O - https://dev2day.de/pms/dev2day-pms.gpg.key | sudo apt-key add -

    Alternate method (which I had to use on the show since I didn’t have a pipe character… I’ve cleaned it up a bit since the live show so it is cleaner since it was an unexpected twist and I kinda made it seem more confusing than it should):

    wget -O /tmp/pms.key https://dev2day.de/pms/dev2day-pms.gpg.key
    sudo apt-key add /tmp/pms.key
  6. Update apt.
    sudo apt update
  7. Install Plex Media Server.
    sudo apt install plexmediaserver-installer
  8. Create the default config file so Plex knows what user to operate under.
    echo "PLEX_MEDIA_SERVER_USER=pi" | sudo tee -a /etc/default/plexmediaserver
    sudo chown -R pi:pi /var/lib/plexmediaserver
    sudo service plexmediaserver restart

    (Thanks to Steve for submitting this additional step)

  9. Reboot one final time.
    sudo reboot

And there you have it! All the commands we used to get Plex Media Server installed on a Raspberry Pi 3 in a nice clean blog post  🙂

Optional: Use External Storage for Media

From there, we plugged in the USB flash drive (don’t do it! Use a proper external hard drive–this was only a demonstration) and after it mounted we used the following command to see its /dev assignment:

sudo mount

Since our drive was /dev/sda1, and of the filesystem type “fat32” this is what I did to make it work as the media library for Plex Media Server:

sudo nano /etc/fstab

and add the following line:

/dev/sda1 /mnt/library fatfs defaults 0 0

I then created the mountpoint:

sudo mkdir /mnt/library

and made it so it can only be written to if mounted:

sudo chattr +i /mnt/library

and finally, mounted the drive:

sudo mount -a

From there, I could easily add folders on my external drive to Plex using the web interface, which you’ll find on Port 32400 in the /web subfolder on your Pi.

To get my IP address, I brought up the terminal on the Pi and typed:

sudo ifconfig

That showed the IP address of my Pi under “Ethernet”… 192.168.0.105

So to open Plex in my browser, from my computer I entered:

192.168.0.105:32400/web

The IP address will most likely be different for yours, and you might even want to set it up as a static IP. Easiest way to do that would be to use your router’s DHCP reservations to hard-set the Pi to something outside your DHCP pool. For me, that’d be 192.168.0.5 or something like that, since the pool seemingly starts at 100.

Good luck, and if you have any questions or comments, please leave them below. Don’t forget, if this has helped you out, or if you just love supporting nice guys who wanna keep giving knowledge for free, please head over to our Patreon page, or throw a bit in the tip jar. Thanks!