Remove ESET Management Agent / ESET Remote Administrator Agent – Batch File for GPO

I’ve got a customer who used to have an ESET Remote Administrator 6 server, and about 85 computers connected to it. That server was deprecated, but a client task was not initiated to remove the old agent first. So essentially, they ended up with 85 machines with an agent pointing to a dead server.

A new ESET Security Management Center server was deployed, and a new agent installer created. However, because ESET changed the name of the agent, installing the new ESMC agent does not in fact upgrade the old agent. So you either end up with two agents, or just remain with the old one pointing to a non-existent server.

You could go around to every workstation and manually uninstall the ERA agent. But yikes, that’d be brutal. You can’t do it unattended even, because the uninstaller asks for a password.

The customer’s site doesn’t have a password to remove it, so you just push enter. But the prompt still appears.

So I wanted to help them do this via a GPO. After all, what’s the point in having a network if you still have to treat each system as independent?

wmic product get name

This command gives me a list of all applications that can be uninstalled. I ran it on my own system and see ESET Management Agent. I have ESMC 7. I ran it on an older system we have here, and it shows “ESET Remote Administrator Agent”. So I wrote a quick batch file to remove either of those two applications.

You can find that batch file here: https://github.com/Cat5TV/eset/blob/master/uninstallers/eset-uninstall-agent.bat

I figure there are probably various names for various versions of the agent, and I’ll add them as I find them.

ESET is currently evaluating my solution, as their support team says they have been encountering this problem more and more and had yet to come up with a solution. I hope it’s able to help some folks.

Robbie // Bald Nerd

NTP on Debian reporting 95 years in the future – Part 2: The Time Traveler

If you haven’t read part 1 yet, make sure you start there.

This issue has really intrigued me.

Setting the date manually fails:

root@nems:/var/log# date
Mon Aug 28 06:39:22 EDT 2113
root@nems:/var/log# date -s "2018-07-05"
date: cannot set date: Invalid argument
Thu Jul  5 00:00:00 EDT 2018

Invalid argument? Maybe it wants me to set the time too?

root@nems:/var/log# date -s "2018-07-05 20:13:01"
date: cannot set date: Invalid argument
Thu Jul  5 20:13:01 EDT 2018

Nope, that made no difference.

Well, what does my hardware clock say (since the Pine A64+ has one)?

root@nems:/var/log# hwclock
2018-07-05 20:13:10.747892-0400

Oh yay, that looks better! Let’s use that! Obviously the system knows the date and time…

root@nems:/var/log# date -s "$(hwclock)"
date: cannot set date: Invalid argument
Thu Jul  5 20:14:20 EDT 2018

Oh, COME ON!

Maybe I’ll try the long-form command…

root@nems:/var/log# date --set="$(hwclock)"
date: cannot set date: Invalid argument
Thu Jul  5 20:15:49 EDT 2018

Nope. Same result. Ach!

This is looking a lot like an old kernel bug I recall from the late 2000’s. Better check what kernel I’m running…

root@nems:/var/log# uname -a
Linux nems 4.14.26 #1 SMP Sun Mar 11 16:34:42 UTC 2018 aarch64 GNU/Linux

If I had hair…

Just to be sure, let’s reconfigure my timezone config:

root@nems:/var/log# dpkg-reconfigure tzdata

Current default time zone: 'America/New_York'
Local time is now:      Mon Aug 28 06:47:54 EDT 2113.
Universal Time is now:  Mon Aug 28 10:47:54 UTC 2113.

root@nems:/var/log# hwclock
2018-07-05 20:19:51.275648-0400

Okay, so let me get this straight… it’s August 28, 2113. But it’s July 5, 2018 according to the RTC.

Think, Robbie, think.

I did a quick grep through the /var/log folder for anything talking about ntp, and interestingly, I find this at the top of dpkg.log:

2018-07-04 08:59:23 startup archives unpack
2018-07-04 08:59:24 install ntpstat:arm64 <none> 0.0.0.1-1+b1
2018-07-04 08:59:24 status half-installed ntpstat:arm64 0.0.0.1-1+b1
2018-07-04 08:59:24 status unpacked ntpstat:arm64 0.0.0.1-1+b1
2018-07-04 08:59:24 startup packages configure
2018-07-04 08:59:24 configure ntpstat:arm64 0.0.0.1-1+b1 <none>
2018-07-04 08:59:24 status unpacked ntpstat:arm64 0.0.0.1-1+b1
2018-07-04 08:59:24 status half-configured ntpstat:arm64 0.0.0.1-1+b1
2018-07-04 08:59:24 status installed ntpstat:arm64 0.0.0.1-1+b1
2113-08-27 19:31:23 startup archives unpack
2113-08-27 19:31:23 install ntpdate:arm64 <none> 1:4.2.8p10+dfsg-3+deb9u2
2113-08-27 19:31:23 status half-installed ntpdate:arm64 1:4.2.8p10+dfsg-3+deb9u2
2113-08-27 19:31:24 status unpacked ntpdate:arm64 1:4.2.8p10+dfsg-3+deb9u2
2113-08-27 19:31:24 startup packages configure

So on first boot, the system had the date correct: July 4, 2018. The time is off by a couple hours however (it was perhaps 6am when I flashed and fired up the system and then left for work).

What’s interesting here is that the typical ntp startup tasks unpack, install and run, but then after the package is installed (a presumably automated process since I didn’t do it!) the date suddenly changes to August 27, 2113.

Being a Raspberry Pi user all my SBC life, I’m honestly impressed that the Pine A64+ has a built-in RTC… but nowhere in the specs do I see that it also includes a corresponding flux capacitor, so I must presume the jump through time is more likely a glitch in the matrix.

I’m afraid to reboot.

What’s Next? Read Part 3:

NTP on Debian reporting 95 years in the future – Part 3: Community

NTP on Debian reporting 95 years in the future – Part 1

Here’s one for the “I’d pull out my hair if I had some” files…

I have a wee SBC (a Pine A64+) I’m porting NEMS to, and everything was sweet for a day… working fine, all looks good. So I left it running.

Next day, while the system clock shows the correct date and time, the UTC and Local time are off by 95 years!

root@nems:/home/nemsadmin# systemctl status ntp
● ntp.service - LSB: Start NTP daemon
   Loaded: loaded (/etc/init.d/ntp; generated; vendor preset: enabled)
   Active: active (exited) since Sun 2113-08-27 20:46:11 EDT; 1min 37s ago
     Docs: man:systemd-sysv-generator(8)
  Process: 1823 ExecStop=/etc/init.d/ntp stop (code=exited, status=0/SUCCE
  Process: 1834 ExecStart=/etc/init.d/ntp start (code=exited, status=0/SUC
    Tasks: 0 (limit: 4915)
   CGroup: /system.slice/ntp.service

Aug 27 20:46:16 nems ntpd[1844]: Soliciting pool server 209.115.181.102
Aug 27 20:46:17 nems ntpd[1844]: Soliciting pool server 144.217.245.233
Aug 27 20:46:17 nems ntpd[1844]: Soliciting pool server 209.115.181.107
Aug 27 20:46:18 nems ntpd[1844]: Soliciting pool server 198.100.148.213
Aug 27 20:46:18 nems ntpd[1844]: Soliciting pool server 2607:4100:2:ff::2
Aug 27 20:46:22 nems ntpd[1844]: step-systime: Invalid argument
Aug 27 20:46:22 nems ntpd[1844]: receive: Unexpected origin timestamp 0x91

root@nems:/home/nemsadmin# timedatectl status
      Local time: Sun 2113-08-27 20:47:55 EDT
  Universal time: Mon 2113-08-28 00:47:55 UTC
        RTC time: Thu 2018-07-05 14:20:36
       Time zone: America/New_York (EDT, -0400)
 Network time on: yes
NTP synchronized: no
 RTC in local TZ: no

root@nems:/home/nemsadmin# ntpdate -d 0.debian.pool.ntp.org | sed -n '$s/.*offset //p'
1292443255.246538 sec

Now, I admit, it’s nice seeing a NEMS server that’s been up for that long 😛 but it’s very curious.

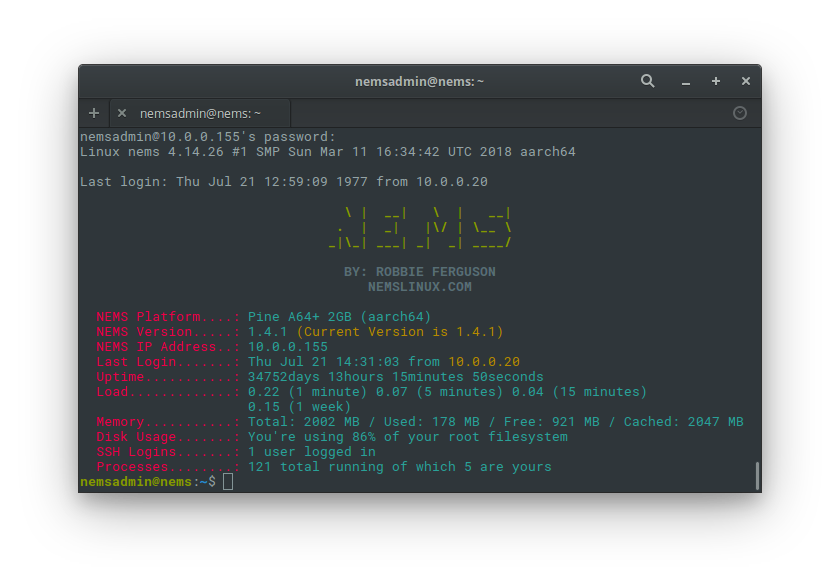
Logging into NEMS Linux, I find another oddity…Apparently my last login was in 1977.

Here is a picture of how that might have looked:

I’m pretty confident that my little Pine A64+ has more power and capacity than the supercomputer shown. Chances are good it also cost a bit less.

So it’s time to start digging… where did NTP get this ridiculous 1292443255.246538 second offset from, and why? And how to correct it?

What’s next? Read Part 2:

NTP on Debian reporting 95 years in the future – Part 2: The Time Traveler

Automatically Deduplicating Data on Debian Linux

Deduplication is the process by which a filesystem (or application) stores data by first comparing data blocks within the data and then only storing one copy of matching data blocks. By doing this, the files require significantly less space on the storage medium.

A good example (just for the sake of understanding) would be WordPress. Let’s say you have a web server with 10 WordPress sites. The WordPress source code in this example is 30 MB on its own. Your server will be storing 300 MB (10x 30 MB). By storing this on a deduplicating filesystem, it’ll be the original 30 MB plus a little overhead for the deduplication data… so let’s say for the sake of ease, your server will be storing just 31 MB for exactly the same data.

These are small numbers. But I recently opened an off-site backup service for NEMS Linux, and I need to be able to store daily backups for its users. Guess what? From day-to-day, a significant portion of those backups are very, very similar. Config files don’t generally change much from day-to-day, most days. So why store them in such a way that they take up 30x the space? Deduplicating is going to save me a ton of storage space.

I’ve been reading up on some deduplication options. My first go-to was btrfs, but it looks like they’re not quite ready yet, with inline deduplication residing only out of tree. I feel like when that feature is implemented in stable, btrfs will be my go-to… but for now, I need to find an alternate solution.

Lessfs is another one I peeked at, but once I noticed their “official” web site was offline, and distribution is done through Sourceforge, I moved on pretty quickly as it seems pretty obvious that either it’s a dead project or at least not a well-supported one.

Then I got looking at OpenDedup’s SDFS, which is a volume-based deduping filesystem, which sounds ideal for my use case, for now. I won’t hold the fact that it is Java-based against it just now as the functionality sounds perfect. Plus SDFS appears well-supported and professional in its presentation, which gives me hope for its future.

I’m going to add some more memory to my little server to accommodate the RAM requirements. Make sure your system has adequate RAM… SDFS likes to eat memory for breakfast. “The SDFS Filesystem itself uses about 3GB of RAM for internal processing and caching. For hash table caching and chunk storaged kernel memory is used. It is advisable to have enough memory to store the entire hashtable so that SDFS does not have to scan swap space or the file system to lookup hashes. To calculate memory requirements keep in mind that each stored chunk takes up approximately 256 MB of RAM per 1 TB of unique storage.” [Admin Guide]

If you’re not using Debian, check out their Quickstart Guide.

Installation of SDFS and its dependencies on my Debian system (would also work for any other Debian-based system like Ubuntu, as long as you are root user):

apt -y install libxml2-utils
wget -O /tmp/sdfs.deb http://www.opendedup.org/downloads/sdfs-latest.deb
dpkg -i /tmp/sdfs.deb

Next up, we need to increase the limit of how many files can be opened at once… again, as the root user:

echo "* hard nofile 65535" >> /etc/security/limits.conf
echo "* soft nofile 65535" >> /etc/security/limits.conf

Next up, I need to create the volume itself, but I want to be specific about where it is stored. In this example I will call the volume “myvolume” and I will store it in a folder called raw_volume in my home folder… this way I know not to touch it (as it is raw):

mkfs.sdfs --hash-type=VARIABLE_MURMUR3 --volume-name=myvolume --volume-capacity=100GB --base-path=/home/robbie/raw_volume

Once created, if you’d like to see the status, type:

sdfscli --volume-info

…and you can view/edit the configuration in the file /etc/sdfs/myvolume-volume-cfg.xml where myvolume is whatever you named yours with –volume-name above.

The reason I’m specifying to store in my home folder is because it will then be part of my backup set (without having to manually add it) and also because my home folder is on a different, bigger drive than the /opt folder, which is where SDFS would default to.

You’ll also notice in the above command I’ve set the capacity to 100GB. It won’t actually take this much space on my drive right now. That is the maximum I’m allowing the volume to become. You can change that to anything you like, to suit your need. On the disk itself (in /home/robbie/raw_volume by my example) the SDFS volume will actually only take up the amount of space of the deduplicated data. If you ever need to make the volume bigger, you can do so by typing the following with the volume unmounted: sdfscli –expandvolume 512GB

Also, since this is a local filesystem, I’ve specified to use a variable block size, which could reduce the amount of space and improve the deduplication.

Now I need to create the mountpoint and mount the SDFS volume so I can start writing data to it:

mkdir /home/robbie/backup
chattr +i /home/robbie/backup

Now let’s prepare the mount.sdfs command:

nano /sbin/mount.sdfs

Scroll to the end of the file and remove “-Xmx$MEMORY$MU”, and edit “-Xms$MEMORY$MU” to instead read “-Xms1M”.

So my final command looks like this:

LD_PRELOAD="${BASEPATH}/bin/libfuse.so.2" $EXEC -server -outfile '&1' -errfile '&2' -Djava.library.path=${BASEPATH}/bin/ -home ${BASEPATH}/bin/jre -Dorg.apache.commons.logging.Log=fuse.logging.FuseLog -Xss2m \
 -wait 99999999999 -Dfuse.logging.level=INFO -Dfile.encoding=UTF-8 -Xms1M \
-XX:+DisableExplicitGC -pidfile /var/run/$PF -XX:+UseG1GC -Djava.awt.headless=true \
 -cp ${BASEPATH}/lib/* fuse.SDFS.MountSDFS "$@"

Then, mount it to test:

mount.sdfs myvolume /home/robbie/backup

Try writing some data to the the mountpoint. If all went well, all should work and automatically dedupe. As I write data to /home/robbie/backup, it is automatically deduplicated to save space!

Next up, adding it to fstab!

If all went well, unmount it and make it so it automounts.

umount /home/robbie/backup

Despite what some people are saying online, yes, you can indeed mount sdfs filesystems using fstab! It’s a fuse-based filesystem! #facepalm

Here’s how I added it to my fstab:

myvolume /home/robbie/backup sdfs defaults,noatime,rw,x-systemd.device-timeout=5 0 0

All is working great, but it’ll be most interesting to see what begins happening once I exceed ~1 GB storage and deduplication starts doing its thing.

The Results

To see the difference in usage, I like simply using this command:

ls -lskh

This will output something along the lines of this:
47K -rw-r–r– 1 root root 1.6M Feb 2 10:02 test2.txt
1.5M -rw-r–r– 1 root root 1.6M Feb 2 09:55 test1.txt

You’ll notice I’ve colorized the filesizes. The first set (indicated in orange) represents the actual usage on disk thanks to deduplication. The second set (blue) is the actual filesize.

I even noted that copying multiple copies of the same file, the “extra” copies showed a use on disk size of 0B! Yes, the impact is so small it didn’t even register! Brilliant.

NEMS Linux – Nagios Enterprise Monitoring Server for Raspberry Pi 3

NEMS Linux – Nagios Enterprise Monitoring Server for Raspberry Pi

Important Note: NEMS started as a small project here on my blog, but since has grown into a full-fledged distro! The blog therefore is here for historical purposes, but for the most current information, please visit the NEMS Linux web site: nemslinux.com


NEMS is a modern pre-configured, customized and ready-to-deploy Nagios Core image designed to run on the Raspberry Pi 3 micro computer. At its core it is a lightweight Debian Stretch deployment optimized for performance, reliability and ease of use.

NEMS is free to download, deploy, and use. Its development however is supported by its community of users. Please consider contributing if you can.

Please Note: NEMS is a very ambitious project, and I’m just one guy. Please consider throwing a little gift in my Tip Jar if you find NEMS saves you time or money. Thanks!

Support
[NEMS Documentation]
[NEMS Community Forum]
[NEMS User Comments]

Index

NEMS 1.1 Featured on Category5 Technology TV


If you like NEMS, please donate: donate.category5.tv

The Out-Of-The-Box NEMS Experience:

Buy The Needed Hardware

Raspberry Pi 3 Nagios ServerRaspberry Pi 3 are very affordable, and using our Micro SD image, you simply buy the device, “burn” the image to the Micro SD card, and boot it up.

Here’s our link to buy the device you’ll need, complete with the Micro SD card, a power adapter, a good solid case, and more: shop.category5.tv

Please buy it through that link, or let me know if you need a customized link to a different model. We get a small percentage of the sale, and it helps to make it possible to offer this as a free download.

Who Creates NEMS:
Robbie Ferguson is the host of Category5 Technology TV. He’s the kind of guy who when he figures stuff out, he likes to share it with others. That’s part of what makes his show so popular, but also what makes NEMS possible.

Support What I Do:
This project is a part of something much bigger than itself, and we’re all volunteers. Please see our Patreon page for information about our network.
– Please support us by simply purchasing your Raspberry Pi at https://cat5.tv/pi
– We have some support links on the NEMS menu, such as buying from Amazon using our partner link. Please use these every time you use those stores. A small percentage of your purchase will go toward our projects.
– Your donations are VERY MUCH appreciated – https://donate.category5.tv – Please consider how many hours (and hours) of work this project has saved you, and how much you’ll save on hardware and even electrical costs as you consider contributing
– Our network also has a Patreon page – Please consider becoming a patron – https://patreon.com/Category5

The new transcoder is proving itself.

Well, we’ve been on the new transcoders for one week now, and I’m excited to see the impact.

Last night was the first night where I was able to initiate an automated transcode of an episode shortly after we signed off the air.

There are still some things I need to work out.  For example, I could not initiate the conversion until I had imported the photos, because the transcoder uses the episode’s image for the ID3 cover art on MP3 transcodes.  So after I finished choosing and uploading the images for last night’s show, I fired the transcoder.

Here’s the log output:

Episode 314 Begin:  Tue Sep 24 20:49:01 EDT 2013
  Create Thumbnail Files Begin:  Tue Sep 24 20:49:01 EDT 2013
  Create LD File Begin:  Tue Sep 24 20:49:01 EDT 2013
  Create HD File Begin:  Tue Sep 24 20:49:01 EDT 2013
  Create WEBM File Begin:  Tue Sep 24 20:49:01 EDT 2013
  Create MP3 File Begin:  Tue Sep 24 20:49:01 EDT 2013
  Create SD File Begin:  Tue Sep 24 20:49:01 EDT 2013
  Create Thumbnail Files Complete:  Tue Sep 24 20:49:57 EDT 2013 (0d 0h 0m 56s)
  Create MP3 File Complete:  Tue Sep 24 20:56:55 EDT 2013 (0d 0h 7m 54s)
  Create LD File Complete:  Tue Sep 24 21:37:23 EDT 2013 (0d 0h 48m 22s)
  Create WEBM File Complete:  Tue Sep 24 22:39:23 EDT 2013 (0d 1h 50m 22s)
  Create SD File Complete:  Tue Sep 24 22:40:07 EDT 2013 (0d 1h 51m 6s)
  Create HD File Complete:  Tue Sep 24 23:20:05 EDT 2013 (0d 2h 31m 4s)
  Move Master File Begin:  Tue Sep 24 23:20:05 EDT 2013
  Create Master File Complete and Finish Job:  Tue Sep 24 23:20:05 EDT 2013 (0d 2h 31m 4s)

It was less than 8 minutes after I initiated the transcoder that the MP3 RSS feeds received the new episode.  Just a little more than 48 minutes after initiating the transcoder, the Low Definition (LD) file completed.  The show went up on the web site almost immediately after that (the files first get sync’d to our CDN and then added to the database, automatically).

All files (MP3, LD, SD, HD and WEBM) were complete in just 2 hours 31 minutes 4 seconds, including all distribution, even cross-uploading to Blip.TV (also automated now).

From 17 hours to only 2.5 hours.  This thing is incredible.

And that means, on average, we’ll be able to transcode nearly 10 episodes per day — almost double the turnaround of our first week.  That means the job which was estimated to take 72 days on our main server alone has been cut to only a day or two longer than one month.  In just one month from now, all back episodes – six years worth of Category5 TV – will be transcoded.

Running phpcs against many domains to test PHP5 Compatibility.

Running a shared hosting service (or otherwise having a ton of web sites hosted on the same server) can pose challenges when it comes to upgrading.  What’s going to happen if you upgrade something to do with the web server, and it breaks a bunch of sites?

That’s what I ran into this week.

For security reasons, we needed to knock PHP4 off our Apache server and force all users onto PHP5.

But a quick test showed us that this broke a number of older sites (especially sites running on old code for things like OS Commerce or Joomla).

I can’t possibly scan through billions of lines of client code to see if their site will work or break, nor can I click every link and test everything after upgrading them to PHP5.

So automation takes over, and we look at PHP_CodeSniffer with the PHPCompatibility standard installed.

Making it work was a bit of a pain in the first place, and you’ll need some know-how to get it to go.  There are inconsistencies in the documentation and even some incorrect instruction on getting it running.  However, a good place to start is http://techblog.wimgodden.be…..

Running the command on a specific folder (eg. phpcs –extensions=php –standard=PHP53Compat /home/myuser/domains/mydomain.com/public_html) works great.  But as soon as you decide to try to run it through many, many domains, it craps out.  Literally just hangs.  But usually not until it’s been running for a few hours, so what a waste of time.

So I wrote a quick script to help with this issue.  It (in its existing form – feel free to mash it up to suit your needs) first generates a list of all public_html and private_html folders recursive to your /home folder.  It then runs phpcs against everything it finds, but does it one site at a time (so no hanging).

I suggest you run phpcs against one domain first to ensure that you have phpcs and the PHPCompatibility standard installed and configured correctly.  Once you’ve successfully tested it, then use this script to automate the scanning process.

You can run the script from anywhere, but it must have a tmp and results folder within the current folder.

Eg.:
mkdir /scanphp
cd /scanphp
mkdir tmp
mkdir results

And then place the PHP file in /scanphp and run it like this:
php myfile.php (or whatever you ended up calling it)

Remember, this script is to be run through a terminal session, not in a browser.

<?php
  exec('find /home -type d -iname \'public_html\' > tmp/public_html');
  exec('find /home -type d -iname \'private_html\' > tmp/private_html');
  $public_html = file('tmp/public_html');
  $private_html = file('tmp/private_html');

  foreach ($public_html as $folder) {
    $tmp = explode('/', $folder);
    $domain = $tmp[(count($tmp)-2)];
    if ($domain == '.htpasswd' || $domain == 'public_html') $domain = $tmp[(count($tmp)-3)];
    $user = $tmp[2];
    echo 'Running scan: ' . $folder . $user . '->' . $domain . '... ';
    exec('echo "Scan Results for ' . $folder . '" >> results/' . $user . '_' . $domain . '.log');
    exec('phpcs --extensions=php --standard=PHP53Compat ' . $folder . ' >> results/' . $user . '_' . $domain . '.log');
    exec('echo "" >> results/' . $user . '_' . $domain . '.log');
    exec('echo "" >> results/' . $user . '_' . $domain . '.log');
    echo 'Done.' . PHP_EOL . PHP_EOL;
  }

  foreach ($private_html as $folder) {
    $tmp = explode('/', $folder);
    $domain = $tmp[(count($tmp)-2)];
    if ($domain == '.htpasswd' || $domain == 'private_html') $domain = $tmp[(count($tmp)-3)];
    $user = $tmp[2];
    echo 'Running scan: ' . $folder . $user . '->' . $domain . '... ';
    exec('echo "Scan Results for ' . $folder . '" >> results/' . $user . '_' . $domain . '.log');
    exec('phpcs --extensions=php --standard=PHP53Compat ' . $folder . ' >> results/' . $user . '_' . $domain . '.log');
    exec('echo "" >> results/' . $user . '_' . $domain . '.log');
    exec('echo "" >> results/' . $user . '_' . $domain . '.log');
    echo 'Done.' . PHP_EOL . PHP_EOL;
  }

?>

See what we’re doing there?  Easy breezy, and solves the problem when having to run phpcs against a massive number of domains.

Let me know if it helped!

– Robbie