I started this thread over in the Telestream forums and have been getting some excellent feedback from the community.
We need to buy a new camera for Studio D.
Basically it boils down to this: right now we use a webcam. We get away with it because we’re confined to a very small space. But Studio D is a much larger space, with more potential “screen area”, and a webcam just won’t work in that environment.
This living blog is where I’ll way the pros and cons of each possible camera, and welcome your feedback either here in the comments below, or directly on the Telestream thread.
1080p vs. Ultra HD vs. 4K
- 1080p gives us 1920×1080 pixels to work with.
- Ultra HD provides a source of 3840×2160 pixels, and
- 4K provides a source similar to Ultra HD at 4096×2160 … a bit wider than Ultra HD.
HDMI vs. HD-SDI
- Both provide full resolution/framerate.
- HDMI at 1080p, we do not need to purchase additional hardware. Anything at Ultra-HD or 4K, we will need to purchase a new capture device, regardless of whether it is HDMI or HD-SDI.
- HDMI maximum cable length is hard to gauge. Some say it’s 25 feet, some say 50 or more. However, in our experience (having tested with our old HDMI consumer camera) a 6 foot length is safe, but 15 feet or more starts to lead to problems (eg., dropped signals). We would not feel safe to use more than say, 10′ of HDMI, which means the broadcast server needs to be extremely close in proximity to the camera itself. You’re already familiar with HDMI: it plugs in and could easily be accidentally unplugged if the cable gets snagged or pulled. HDMI does offer wireless options in 1080p, but at this point I haven’t seen a 4K model. Also, HDMI to SDI converters can be purchased cheaply.
- HD-SDI is generally safe at a maximum of 300 feet. This means our broadcast server can be well away from the camera, and we can move the camera around much more freely within our studio space. HD-SDI “locks” into place. It will not come out of the camera or the server if it gets snagged. For these reasons, HD-SDI is preferable over HDMI. HD-SDI traditionally adds a fair bit to the cost of a camera: it is the “professional” option, whereas HDMI is the consumer option.
So… which camera should we buy? Please comment below and send in your contribution here to help us make this upgrade a reality. If you are local or able to mail a cheque, please consider sending payment by cheque rather than PayPal to save us the high transaction fees.
Prices shown are in USD. To see how much it would actually cost us in our local currency, click the amount.
These are listed by price, highest to lowest. Higher price does not necessarily mean better. That’s what we need to weigh.
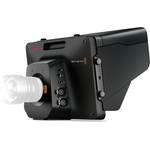 Blackmagic Design Studio 4K
B&H List Price: $2,995*
Comments: This would be our ultimate choice. The quality of this camera will be superb, and it is built specifically for our purpose (studio use). The cost is the prohibitive thing. The camera is pretty pricey, and a lens will add another $1,000 or more to that price.
Pros: Ultra HD. Multiple camera angles from one camera, including lossless digital zoom. Built-in HD-SDI. Professional (studio) form factor.
Cons: *Does not include lens. Rather expensive (although comparatively cheap compared to other studio cameras of this quality and featureset). No WiFi controls (but does have LANC controls for Iris and Focus, if we buy a separate controller). Auto-focus only available with specific lenses and not realtime.
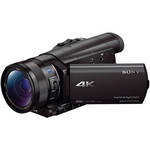 Sony FDR-AX100 4K
B&H List Price: $1,998
Comments: A good value option for sure. The features are impressive for the price, and we’d get excellent picture quality. The form factor is very appealing (much more like a traditional camcorder), and the fact that it has built-in optical zoom is quite cost savings (no expensive lens to add). However, the lack of ability to change the lens is quite restricting in the long run, plus this one has no option for HD-SDI. It’s HDMI output or nothing. For cost-effective models, this is likely our best option.
Pros: Ultra HD. Includes lens. 1″ CMOS sensor. WiFi control. Realtime auto focus. I really like the “camcorder” form factor. Built-in ND filters. Includes a wireless remote control which allows optical zoom. Focus ring makes it compatible with follow focus hardware (that ring is very close to the lens!)
Cons: Maximum 30fps when shooting in Ultra HD mode (60p available in 1080p mode).
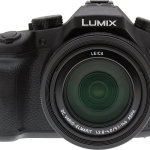
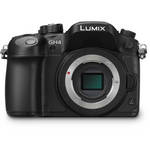 Panasonic Lumix DMC-GH4
B&H List Price: $1,697.99*
Comments: This is the game-changer 4K DSLR. Exceptional quality and great lens options. However, the cost to get HD-SDI on this camera makes it a dud. You might as well get the BlackMagic camera (which is built for studio use) for the price.
Pros: 4K (higher horizontal resolution than even the Blackmagic camera above). Multiple camera angles from one camera, including lossless digital zoom. WiFi controllable.
Cons: No HD-SDI. HD-SDI may be added via an interface accessory which costs an additional $2,300 (making this camera cost more than the BlackMagic Studio 4K to get HD-SDI). Could we use an HDMI to HD-SDI converter instead? *Does not include lens. Has auto-focus if you buy specific lenses, but it’s not as good as the Canon units (but can use WiFi app to control focus). DSLR form factor: will require the addition of a follow focus rig.
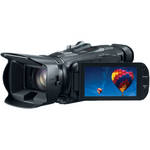 Canon Vixia HF-G30
B&H List Price: $1,399
Comments: Beautiful 1080p quality, but the only reason we’d go with 1080p is if we had no option to go with 4K.
Pros: Includes lens. Larger sensor than the G20. Has WiFi controls. 60p recording mode (not necessary, but could be neat for slow-motion reviews). Improved positioning of the output jacks. Switch to control the use of the manual dial ring. Realtime auto-focus. I really like the “camcorder” form factor.
Cons: No HD-SDI. HDMI only. Will require multiple cameras to attain multiple angles. Seems like a pretty high premium, approaching a little too close to the 4K price range.
 Canon Vixia HF-G20
B&H List Price: $899
Comments: Another great 1080p camera, but 1080p is not the best option for us.
Pros: Includes lens. Comparatively cheap for great picture quality at 1080p. Realtime auto-focus. I really like the “camcorder” form factor.
Cons: Interlaced at 60p. No HD-SDI. HDMI only. No 60p. No WiFi controls. Will require multiple cameras to attain multiple angles. Controls are largely based on touch screen.
 Panasonic FZ1000
B&H List Price: $897.99
Comments: This one appeared out of nowhere. The form factor is terrible, and the lens is locked in place with no ability to change or upgrade it. However, it’s 4K video for under $1,000. Is it good? We haven’t touched it yet, but I’m guessing this is one of those “too good to be true” things. Auto-focus will be the big challenge here, and because of the layout of the built-in lens, a follow focus rig can’t be used to provide fluid manual focus. This is basically the “cheap consumer 4K” option, and likely will perform as such. Also, HDMI only, and powered by battery.
Pros: 4K video for under $1,000! 1″ Sensor. Lens is included (see cons as well). Reportedly supports 4:2:2 4K clean output (over HDMI). Built-in autofocus.
Cons: Lens is built-in, not changeable/upgradeable. No HD-SDI. Cannot record or monitor while live streaming over HDMI (although this can be resolved by purchasing an external monitor connected to our Wirecast server). DSLR form factor and not compatible with a follow focus rig. No A/C Power: must be powered by battery.
Since this is a living blog, please check back often. I will update this with any new findings or other changes, and I welcome (and appreciate) your comments below, and contributions to the project.
— UPDATE: September 12, 2014
We’ve raised roughly $1,500 so far. Thank you to those who are supporting this venture!
As Studio D fast approaches, I’ve been considering our options more and more. 4K is the route I would love to go, and I think it best suits the show in the new space, and will give us the best quality possible. If however, we can’t afford it, and the main advantage stems from being able to shoot multiple angles, the idea of purchasing multiple 1080p cameras instead of one 4K camera is a good option (and cheaper), although the disadvantage is the increased floorspace of another camera and increased broadcast server resource usage to power two cameras live.
We’re also going to need a teleprompter for the news segment and possibly viewer questions, so whatever camera we use for that purpose will need to be reasonably close proximity (4m).
— UPDATE: December 20, 2014
Thank you to everyone for your continued support! I thought I should update you on how I think this is going to happen. Simply put, we do not have enough funds to go 4K … yet. So I’ve been looking for “stepping stones”.
Right off the top I’ll let you know, one of the big changes in Season 8 is that Adam has joined us as camera operator, so we are no longer 100% reliant on digital zoom: we have someone who can actually zoom the optics, for example. This means 1080p is much higher quality than it was when we were using digital zoom on the 1080p canvas, as we are able to take advantage of the full 1920×1080 resolution of the camera.
So that said, the HF-G30 looks like the best stepping stone at first, but then I realize sinking the funds into that would be like resetting the fundraiser and ending up with a “final product” — not something that can be upgraded down the road.
What I’ve been thinking is, build a DSLR rig. This is basically like building a cage that “converts” a DSLR into a video camera. It makes the DSLR form factor cameras (which are generally cheaper) a much more reasonable option, giving the camera operator off-camera focus / zoom controls.
Thanks to Nikon Hacker, we can start by using our existing DSLR (a Nikon D5100), mount it in the rig, and use that while we continue to raise funds. Then, when the time comes that we can go 4K, we can simply remove the DSLR from the rig, and replace it with the new 4K DSLR. This is a much truer “stepping stone” approach since all the hardware that makes it work (follow focus, in particular) will then be used on the next iteration. It also means DSLRs become a more viable option (it wouldn’t have worked had we not had a video operator), and we can improve the quality during the process (by using our DSLR rig), which hopefully means more advertisers and contributions since the show will look a lot better than it does through our current solution.
Thoughts?