The Pinebook, released in 2017, was–and still is–an exciting product. The company responsible, PINE64, created a low-powered, low cost ($99) System on a Chip (SOC) laptop. But while the Pinebook is fantastic for tinkering and basic Internet usage, it was never intended to be a day-to-day laptop replacement1. Rather, it provides tinkerers a way to learn Linux and ARM without the need of a separate single board computer (SBC), keyboard, mouse and screen.
PINE64 has firmly established itself as one of the most highly-respected SBC manufacturers in the world, and the Pinebook proves that they refuse to be put in a box. Led by their founder TL Lim, PINE64 are a creative and innovative company, with a solid grasp on the needs of not only the makers and tinkerers, but also of the free and open source software fanatics, as well as the hardware hackers. All this while demonstrating a clear understanding of what the related community mentality is all about. Put all these traits together, combined with the talents of the wonderful people who comprise the PINE64 team, and you’ve got a force to be reckoned with, with a company whose products appeal to a very wide range of users.
Now, it’s 2019 and the Pinebook is evolving.
Today, PINE64 is unveiling the new Pinebook Pro, which is going to change the exciting world of SOC laptops.
With a target price of just $199 USD, the expectations surrounding the Pinebook Pro are quite different than those of the original Pinebook. I had the privilege of chatting with Lukasz Erecinski from PINE64 and he believes the 64-bit ARM Pinebook Pro could be used as your daily laptop, offering a compelling alternative to a mid-range Chromebook with some impressive specs for the price.
During our discussion, Erecinski says, “It is much more powerful than the Pinebook, it has much more memory; 4 gigs of RAM, and we expect that this could really be a daily driver.”
This changes everything. Erecinski says that there are “so many people out there who take a Chromebook and transform it into a Linux laptop. We looked at that market and we thought, what about a proper laptop? A real laptop replacement based on ARM64 architecture that is built from the ground up with free and open source software in mind, having features which you rarely find on high-end or mid-range Chromebooks such as a lot of internal storage, a 1080p IPS panel, as well as high-quality materials for the build.” He goes on to explain, “We’re using aluminium alloy for the Pinebook Pro.”
A First Look at the Pinebook Pro

Pinebook Pro Prototype 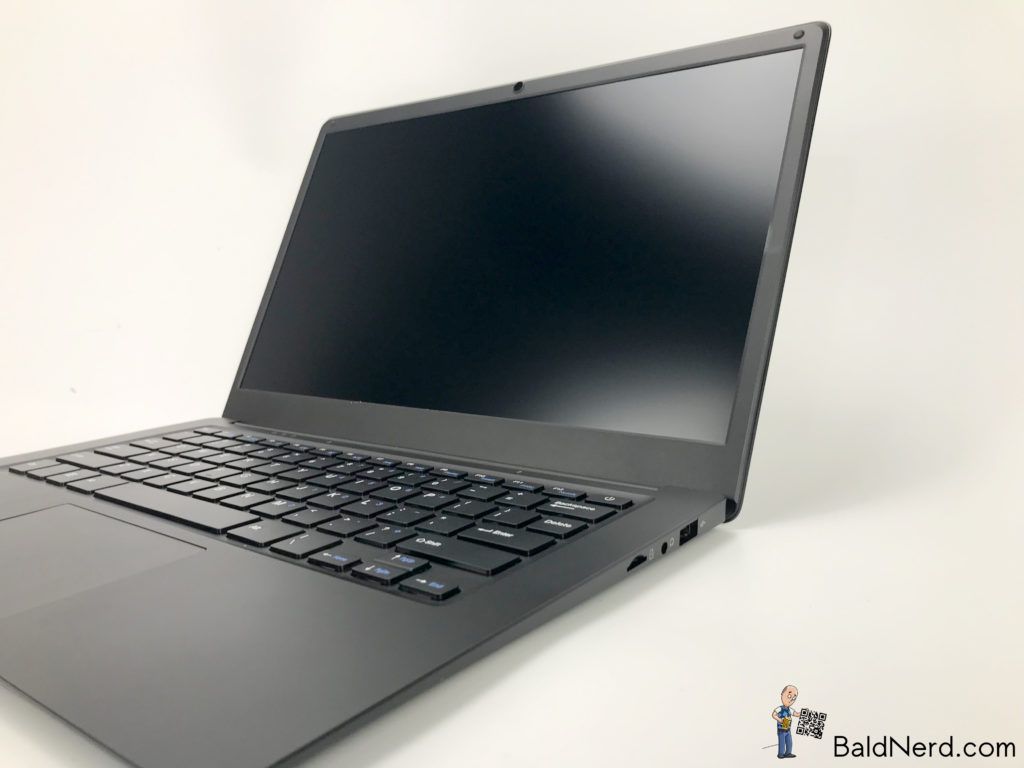
Pinebook Pro Prototype 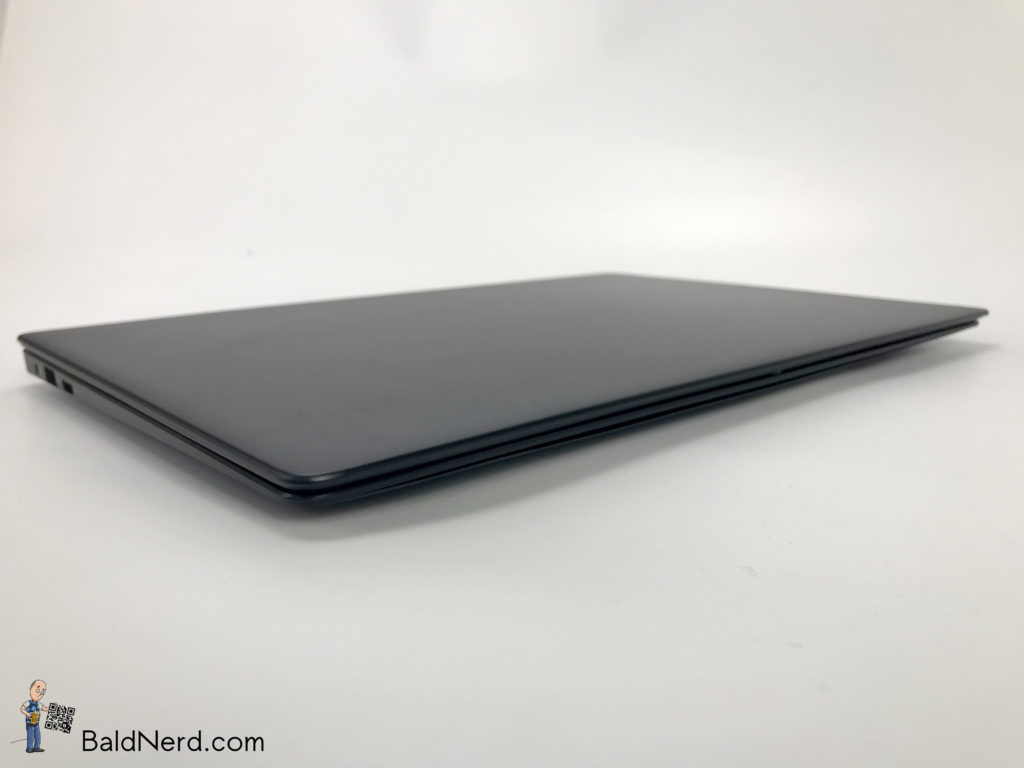
Pinebook Pro Prototype 
Pinebook Pro Prototype 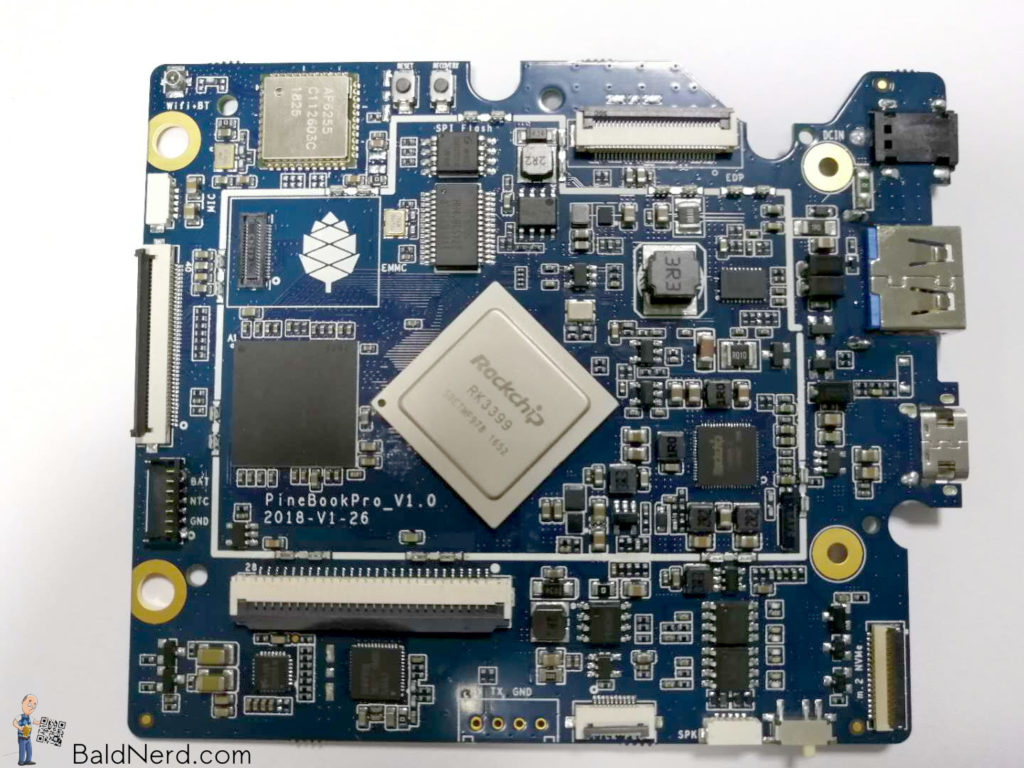
Pinebook Pro v1.0 Board
Erecinski says of the Pinebook Pro, “in a sense, it is a part of the RockPro64 lineage: it features the same SOC, same memory, and we expect it to be completely compatible with the single board computer that we had rolled out last year.”
From the Pinebook Pro to the Open Source IP Camera “CUBE”, a retro gaming case, and an updated Rock64 and H64 – PINE64 has more to tell you about… Watch the full interview with Lukasz Erecinski on my YouTube channel:
The Pinebook Pro has a 14″ IPS LCD screen at full 1080p resolution, plus support for digital video output via USB-C. By default, the Pinebook Pro comes with 64 GB of eMMC storage, has a 10,000 mAh battery, and like we’ve come to expect from PINE64, the Pinebook Pro is built to be hackable.
The folks at PINE64 are freaking awesome and know how to show their community love. As a way to thank their community, they’re doing something more: If you are a registered user in the PINE64 forum, PINE64 will upgrade the eMMC in your Pinebook Pro to a whopping 128 GB eMMC, no extra charge!
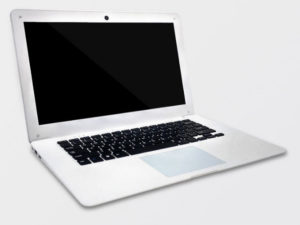
The original Pinebook–as awesome as it is in its own right–feels cheap. It’s plastic. It’s white. It looks and feels a bit like a toy. The Pinebook Pro however feels solid with its magnesium alloy (aluminium) body, which also has a much higher-end look to it with an attractive matte black finish. It’s super thin, which really gives it that look of a much higher-priced laptop.
As was the case with the original Pinebook, the Pinebook Pro features minimal branding. Take that as you will, but I think it gives the Pinebook Pro a very refined look. I can’t stand the apple on the back of a Macbook, and I loathe the bevelled Dell logo on the back of my i7, so I greatly respect this choice by PINE64 to keep the chassis clean, allowing me to either go for that sleek, professional look, or plaster it in stickers to my heart’s content.
The Pinebook Pro has enough power to handle HD video beautifully, and to top off the viewing experience, it has built-in Bluetooth 4.2 to connect your headphones or other Bluetooth device.
Digging deeper into the system, like the RockPro64, we’ve got a Rockchip RK3399 Hexacore SOC, which contains the Dual Cortex-A72 + Quad Cortex-A53 64-bit CPU. The Pinebook Pro has 4 GB of LPDDR4 RAM.
The Pinebook Pro also features a PCIe x4 slot which will allow the addition of a m.2 NVMe SSD.
We also find a MicroSD card slot, audio output, USB 3.0 and 2.0 ports, 802.11ac WiFi, a 2 MP forward-facing webcam plus built in speakers and a microphone in the Pinebook Pro.
PINE64 have included a barrel jack for charging, which I personally prefer. However, they’ve again heard the cry of the community and made it so you can also charge the Pinebook Pro via the USB-C port.
According to Erecinski, the original Pinebook is not going anywhere. He also shares that PINE64 will be offering an optional upgrade kit for users to be able to upgrade their standard Pinebook to a more Pro-like model.
PINE64 is working on ways to bring down the cost of shipping for the Pinebook Pro, and in the process they hope those improvements will trickle down to the regular Pinebook line as well.
Erecinski says the target release for the Pinebook Pro is the second half of 2019. “The first prototype is here. We’ve got three prototypes. They will go to three key projects that we’re working with.” That is to say, developers of the coming operating systems for the Pinebook Pro. “We want to have at least two or three operating systems in place for when it rolls out,” says Erecinski. “We’re also going to have a scheme where other developers will get their units a bit earlier, ahead of users so they can port their OS to the Pinebook Pro as well.”
Pinebook Pro System Specifications
- 14″ 1080p IPS LCD panel
- 64GB of eMMC storage
- Black magnesium alloy body
- MicroSD card slot
- Digital video output via USB-C
- Audio aux out / UART
- USB 3.0 and USB 2.0 ports
- 802.11ac WiFi
- Bluetooth 4.2
- 4GB of LPDDR4 RAM
- Charging via barrel port or USB-C
- Rockchip RK3399 Hexacore SOC
- 2mpx front-facing camera
- Microphone
- Speakers
- Slim and slick design with minimal branding
- PCIe x4 that can take a m.2 NVMe SSD
- Price: aiming at $199